Eclairs are one of those pastries that we often admire in a display case at a professional bakery and think, “Wow I could never make that!” This seemingly intimidating treat is a lot easier to make than you would think. We have created a step-by-step process that starts with the foundation of this delicious dessert, choux pastry, and leads you through the baking process, how to fill your eclairs and finally how to finish them with a delightful glaze.
What is choux pastry?
Choux pastry is a twice cooked dough that is made up of very few and humble ingredients. It consists of water or milk, flour, salt, eggs, and sometimes sugar. It is cooked once on the stove after the liquid and butter are brought to a boil, and the flour is added. It is baked/fried depending on the recipe for a second time when the pastry is finished and piped into its desired shape.
Who invented choux pastry?
The invention of Choux pastry dates back to 1540 to the court of Catherine de Medici, where her head chef, chef Pantanelli, is credited for inventing it. Choux pastry is the base for cream puffs, eclairs, profiteroles, beignets, churros and many more delicious desserts.
Should I use milk or water when making my choux pastry?
Whether you use milk or water in your recipe is entirely up to your preference. Water creates a crispier outer shell after the choux pastry is baked, while milk lends a more tender and soft shell. Some recipes use a combination of both milk and water.
Are eclairs hard to make?
Eclairs use different techniques than most recipes you may be familiar with. The ratio of liquid to dry is also more critical than that of cakes, cookies, and pie crusts. The below instructions take you through step by step on how to make eclairs with details to nail each technique. We also have an eclair troubleshooting guide and an eclair baking kit with pre-measured ingredients, materials, and piping tips you can buy here while supplies last.
Learn to make perfect eclairs!
Pre-measured ingredients, materials, French star and Bismarck piping tips and a recipe card to help you create the perfect eclairs.
Making eclairs detailed instructions!
Making choux pastry
Step 1: Cut 8 tablespoons of butter into 8 pieces and place into a heavy bottomed pan or pot along with a cup of water or milk. It is important to use a pan or pot with raised sides so that when you are stirring in your flour you don’t fling out your pastry in the process. Turn your heat on medium high and bring the ingredients to a boil, stirring occasionally to marry the butter with the water.
Step 2: When the liquid comes to a boil, turn off your heat and add in a cup of flour and ¼ teaspoon of salt all at once. Using a wooden spoon or heat proof spatula stir the ingredients vigorously, breaking up any lumps of flour. This is a very important step in making the choux pastry. The pastry is continuing to cook over the residual heat and in the process, moisture is evaporating from the product. It is important to make sure that enough moisture has evaporated before moving on to the next step. If the dough is too wet before adding in the eggs it can result in a flat eclair with very little rise, or an eclair with a soggy bottom.
How do you know if enough moisture has evaporated from choux dough cooked on the stove?
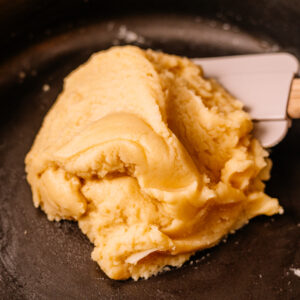
As you are stirring you will notice that the pastry will start pulling away from the sides of the pan and come together to form a tighter and tighter ball. This cohesiveness is a good sign, and you should continue to stir the pastry until you notice that it is starting to form a film on the bottom of the pan. When you draw your spoon or spatula through it, there is a slight streak of product left behind before it is incorporated into the rest of the pastry dough on the next stir. At this point you are ready to move on to the next step.
Step 3: Choux pastry can be made by hand from start to finish, however it is quite the workout. We recommend using a stand mixer with a paddle attachment or a hand held mixer. Place your dough into the bowl of a stand mixer, and turn it on medium-low speed for 2-3 minutes. Mixing the pastry on this low speed will help it to cool down before adding in our eggs. If you add your eggs in while the pastry is too hot you risk scrambling them.
Step 4: Have four eggs ready to crack and add to your pastry dough. Crack the 1st egg in a small bowl and pour it into the mixer bowl. Turn the mixer on medium speed.
*Note: It is a good practice to crack your eggs on a flat surface and into a separate bowl than the one in which your product is in, that way you can avoid getting egg shells in your finished product. It is important to add the eggs one at a time for two reasons. The first reason is to ensure that the pastry dough is able to absorb the eggs efficiently without becoming overworked. The second reason is you might not need to add all four eggs to your pastry dough. This could occur if you didn’t evaporate enough liquid out of the pastry dough in the initial cooking process or if there were uneven measurements and the liquid to dry ratio was slightly off. You should check your dough consistency after adding in the third egg to determine whether or not you should add in your fourth egg. We will explain more below what to look for at this stage.
You will notice at first that your pastry dough looks broken, don’t worry it will start to absorb the egg and will come together. After your first egg is completely mixed into the rest of the pastry, and there are not any remaining streaks of egg white, it is time to add the second egg. Repeat this process of turning the mixer on medium speed and incorporating the second egg, scraping down the sides of the bowl and then the third. After adding the third egg and mixing it into the pastry dough, stop your mixer and lift the paddle. If the dough is clinging to the paddle and not flowing off, it needs the edition of the fourth egg. Add in the fourth egg and mix to incorporate.
Video: How to make eclairs
Want to make eclairs or another one of our recipes, but prefer to skip the ingredient shopping and measuring? Check out bakeeatlovebox.com – we ship baking kits to your doorstep.
How do I tell if my choux pastry is at the right consistency?
You are looking for your choux pastry to have a nice fluidity and sheen to it. There are two tests that you can perform to see if your pastry dough is just right.
- After mixing in the last egg, take your spatula and dip it into the dough and pull up. If the choux pastry starts to drip off the spatula and create a v-shape, this is a great sign that your choux pastry is at the right consistency.
- Take a clean finger and drag it through your pastry. If it leaves a trough indentation in the dough and is not quickly flowing into the trough, then your choux dough is good to go!
Piping your eclairs
Step 1: Preheat your oven to 375 degrees F.
Step 2: Prepare two baking sheets, with parchment paper.
Step 3: Open up your pastry bag and place your piping tip at the bottom of the piping bag. We recommend using a french star tip for eclairs. It allows the choux pastry to flow out easily and creates a nice even shape. Cut about ¾ inches off the tip of the piping bag and adjust the tip so that it is snugly at the bottom of the piping bag. Take a standard pint glass and line it with your pastry bag. Using a spatula, scoop your choux pastry into your piping bag. The glass allows you to have a base that holds your bag upright and open for you as you add in your choux pastry. When all of the dough has been added, lift the bag out of the glass and work the pastry dough to the bottom of the bag and twist off the top.
Step 4: On your baking sheet lift the parchment paper on one of the corners and onto the baking sheet add a small amount of choux pastry and pat the parchment paper down over it. Do this in each corner and for each tray. The choux pastry helps glue down the parchment sheet so that it stays in place while you are piping. At a 45 degree angle pipe your eclairs about 4 inches long and 2 inches apart, they will expand in the oven. If you are having difficulty with keeping the amount of pastry consistent throughout the strip you can try piping the eclairs in a dog bone shape where there is more dough at each end of the eclair. If your choux pastry is slightly lifted on the end of each eclair you can dip your finger in a small amount of water and gently pat down these tails.
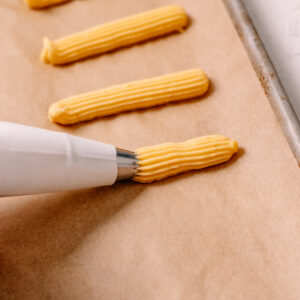
Step 5: Place your eclairs on the center racks of your oven and bake for about 23-27 minutes. We recommend baking one sheet at a time for optimal heat circulation. Try not to open your oven door, until about 12 minutes into the baking time. The choux pastry will bake and rise more evenly if the oven door is left closed. At around the 12-minute mark you can turn each of the trays to ensure a more even bake. You are looking for a nice golden-brown color, and once you have achieved this you can remove your eclairs from the oven and test them by picking one up with an oven mitt and knocking lightly on the bottom. If it makes a hollow sound, then your eclairs are done baking. Take a toothpick and poke a small hole at the end of each eclair. This will allow steam to escape and for the eclairs to cool completely.
Filling your eclairs
Step 1: While your eclairs are baking, make your filling. There are several recipes for pastry cream that you can make to fill your eclairs. Classically eclairs are filled with vanilla pastry cream, but chocolate pastry cream is sometimes used as a fun twist. If you would like a quick and easy, but still delicious, pastry cream shortcut check out our recipe at the end of the post that gives step by step directions on how to create this approachable pastry cream.
Step 2: After your eclairs have cooled, and your pastry cream is chilled and at the desired consistency take a piping bag, snip off about ¾ inches from the end and add your piping tip. We recommend using a bismarck piping tip for filling your eclairs. It allows you to get the pastry cream inside of the eclair easily and fill it. Line a pint glass with your prepared piping bag and spoon in your filling. It’s a good idea to bend the end of the piping bag so the piping tip is pointing up. This will ensure your piping tip does not move backwards and into the bag. It also helps prevent the cream from leaking when you are filling the bag.
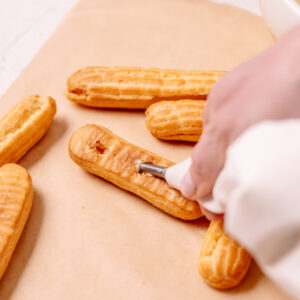
Step 3: With the end of a paring knife, on the underside of the eclair, cut three small x’s the length of your eclair. One x at one end, one in the middle and one near the other end.
*Note: If your eclairs came out a little flatter than you had hoped, do not despair! Using your paring knife cut each eclair equally in half like a hot dog bun and lay the exposed insides face up next to their matching halves on your baking sheet. Check out our choux pastry troubleshooting guide to achieve a hollow center next time.
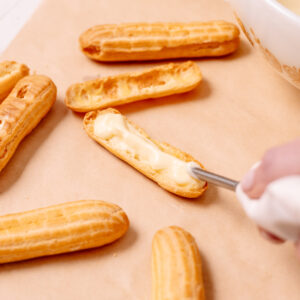
Step 4: Pull your piping bag out of your glass and work the filling towards the tip by gently squeezing the product in that direction while twisting the top of the bag. If filling your eclairs from the bottom, insert the tip in the first x at a slight angle and slowly pipe until the first cavity is full. Place the tip in the two additional x’s and repeat the process until your eclair is heavy and full. You can wipe off any excess pastry cream with a paper towel. Continue filling the rest of your eclairs until they are all filled with pastry cream. If using the sandwich method, pipe your filling on the bottom half of each eclair in a zigzag pattern from top to bottom. Place the top half of the eclair on top of each bottom filled half.
Finishing your eclairs
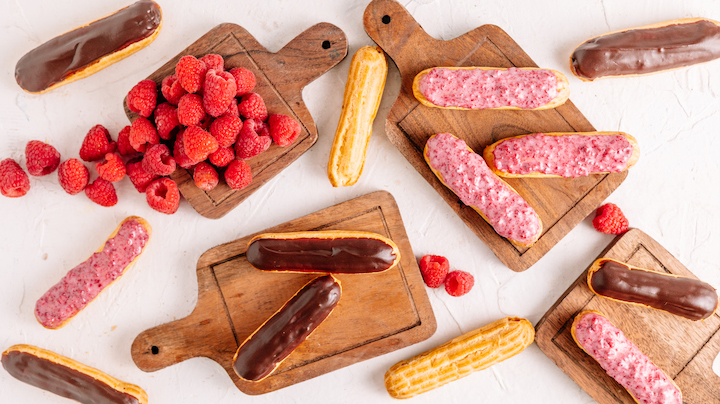
Classically eclairs are dipped in a shiny chocolate ganache, however there are many different topping flavors that you can dip your eclairs into. Our recipe gives you directions on how to make chocolate and raspberry dipping sauces.
Step 1: Make your topping
Step 2: For the topping mixture you want the consistency of the topping to be smooth and fluid. Take each eclair and dip them into your topping. Sea-saw them back and forth slightly to ensure the whole length of the eclair is coated. Shake off any excess and place it on your baking sheet to set. If you have the sandwich style eclair, take off the top of the eclair and dip it in your topping, making sure to sea-saw it back and forth and shake off any excess topping before placing it back on top of the bottom half.
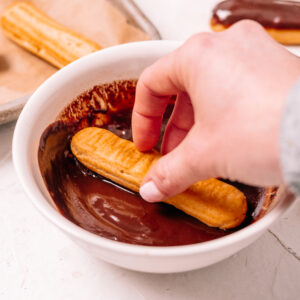
*Note: If your topping is too thick, you can use a spoon to glaze your eclairs. It is best to place your eclairs on a wire rack, if you have it, so excess topping can flow off. Simply spoon up some of the filling and glide it across the length of the eclair. Use the side of your spoon to clean up the edges along the length of the eclair.
How to store your eclairs
Eclairs can last up to two days in the refrigerator once they have been filled and dipped. After two days the filling can start to make the bottoms soggy.
If you would like to make your eclairs in advance you can take the baked and cooled shells and place them in an airtight container in the fridge for up to three days. When you are ready to enjoy them, you can fill them and dip them.
Eclair shells also freeze well. You can place the baked and cooled shells in an airtight container and freeze them for up to 2 months.
Check out our eclair troubleshooting guide for tips and tricks to making the perfect eclairs!
How to make choux pastry
Recipe
How to Make the Perfect Eclairs
Description
Put on your favorite French tunes as you learn to make choux pastry (don't worry, it's not hard!), fill your eclairs with a creamy vanilla filling, and top them with a decadent glaze. Voilà! Enjoy your eclairs with loved ones and make them time and again with these step-by-step instructions.
Want to try making eclairs or another one of our recipes, but prefer to skip the ingredient shopping and measuring? Check out bakeeatlovebox.com - we ship baking kits to your doorstep.
Raspberry and Chocolate Eclairs
Eclairs
Filling
Chocolate Topping
Raspberry Topping
Instructions
-
Eclairs
Move an oven rack to the center. Preheat to 375°F. Place a silicone mat or parchment paper on a baking sheet(s).
Add 8 tbsp of butter (sliced into 8 pieces) and 1 cup of water to a medium saucepan on medium high heat. Bring to a boil and stir with a heat resistant spoon or spatula until your butter has melted and blended into the water. Turn off your stove. Add 1 cup of flour and ¼ tsp of salt. Stir until all flour clumps are incorporated, the mixture begins to form a smooth dough ball, and a thin film forms on the bottom of the pan (about 3 minutes). This is an important step to evaporate excess moisture! You may need to move back onto medium low heat to get this effect.
Add dough to a stand mixer or medium bowl if using a hand mixer. Mix 2-3 minutes to release steam and cool the mixture. It will be warm, but not hot. Add eggs, one at a time, mixing well after each, until completely incorporated. After you’ve added the last egg, stir until your mixture forms a dough, all of the glossy egg texture has been mixed in, and there is a sheen to the dough. Scrape edges and mix for a few seconds.
Cut the piping bag tip and insert the French star piping tip. Spoon dough into a piping bag and pipe 4-inch strips of dough 2 inches apart onto prepared baking sheets. How you pipe the dough matters. Pipe at a 45-degree angle. Eclairs should be straight and the amount of dough consistent throughout the eclair. If piping is not your forte, eclairs can be slightly thicker at the ends. However, if they are thicker in the middle, they will not rise properly. The dough strips may look too thin, but they will rise and expand in the oven.
If you have two baking sheets, bake each separately. This helps eclairs bake evenly. Bake for 23-27 minutes. The eclairs should be golden. Bake 5-10 minutes more until they are a deep golden brown. To test if they are ready, pick one up with an oven mitt and lightly tap the bottom. When done, they will make a hollow sound. Remove from the oven and use a toothpick to poke a hole in each end to allow steam to vent. Cool completely.
-
Filling
In a medium bowl, mix 3.4 ounces of instant vanilla pudding mix and 2 cups milk with a whisk for 1 minute. It’s best to use cold milk. If you don’t have cold milk, after mixing, refrigerate until a thick pudding forms.
In a stand mixer with whisk attachment or an electric hand mixer and medium bowl, beat 1 cup whipping cream on medium high until whipped cream forms, 4-5 minutes. Fold whipped cream into pudding.
Cut one eclair in half horizontally (sandwich style) with a knife. If it is hollow, use a knife tip to slice 1-3 small X’s on the bottom of each eclair. Make 1 X if your test eclair was completely hollow. Make a few more X’s if the choux structure created barriers. If it’s not hollow, cut the eclairs in half horizontally and check out the troubleshooting guide on how you can create a hollow choux pastry next time.
Cut the piping bag tip and insert the bismarck piping tip. Fill with cream. If eclairs are hollow gently poke the piping tip in each X and pipe until heavy. If you only cut 1 X, pipe filling to one end. Keeping the tip inserted, turn it then pipe into the other end. Try not to poke through the top of the eclair. Wipe excess filling with a paper towel. If eclairs aren’t hollow pipe filling onto bottom and sandwich with the top half.
Topping
-
Raspberry
Place freeze dried raspberries in a ziplock bag, and seal. Roll a rolling pin over the sealed back to finely crush raspberries. In a small bowl wide enough to dip the tops of the eclairs, mix raspberries and ½ cup powdered sugar with 1 tablespoon milk. Stir until a thick icing forms. Dip the tops of half of your eclairs in the icing. Allow extra icing to drip off (use a spoon if needed) before flipping over to dry. Have a damp washcloth handy to easily remove icing from fingers. If your icing is too thick, add up to a teaspoon of milk. Refrigerate eclairs until serving.
-
Chocolate
Place ½ cup of chocolate chips and 2 tablespoons milk in a small microwaveable bowl, wide enough to dip the top of the eclairs. Heat in the microwave for 30 seconds, stir vigorously. Mix until all chocolate is completely melted and smooth. If chocolate hasn’t melted after stirring, heat 15 seconds and stir one more time. Dip half of your eclairs into the mix. Refrigerate until serving.
